搜索到
14
篇与
的结果
-
 Unity 脚本 | Unity3d 跳过启动动画 用 Unity3d 写的小程序编译好后,总是有启动动画,有时候就很烦。研究了一下,把以下脚本放到项目中,不用挂载,再编译就没有启动动画了。新建一个脚本,起名为 SkipUnity3DStartMove.cs 打开把以下内容粘贴进去using UnityEngine; public class SkipUnity3DStartMove : MonoBehaviour { #region 跳过启动动画 [RuntimeInitializeOnLoadMethod(RuntimeInitializeLoadType.BeforeSplashScreen)] private static void BeforeSplashScreen() { System.Threading.Tasks.Task.Run(Asyncskip); } private static void Asyncskip() { UnityEngine.Rendering.SplashScreen.Stop(UnityEngine.Rendering.SplashScreen.StopBehavior.StopImmediate); } #endregion // Start is called before the first frame update void Start() { } // Update is called once per frame void Update() { } }
 -
Unity 脚本 | Unity相机控制脚本(鼠标键盘控制,简单实用) unity相机控制脚本,思路是仿照Unity Scene 里面控制的逻辑鼠标滚轮 上滚 拉近视野(放大),下滚 推远视野(缩小)鼠标滚轮 按下并拖动,调整相机位置鼠标右键 按下并拖动,调整相机视角左键留空w a s d 类似于 fps 游戏一样前后左右移动ctrl 向下移动空格 向上移动该脚本直接挂载在相机上就可以用using System; using System.Collections; using System.Collections.Generic; using UnityEngine; public class MouseOperationCameraRotationFovMove : MonoBehaviour { public enum MouseState { None, MidMouseBtn, LeftMouseBtn } private MouseState mMouseState = MouseState.None; private Camera mCamera; private void Awake() { mCamera = GetComponent<Camera>(); if (mCamera==null) { UnityEngine.Debug.LogError(GetType()+"camera Get Error ……"); } GetDefaultFov(); } private void LateUpdate() { CameraRotate(); CameraFOV(); CameraMove(); } #region Camera Rotation //旋转最大角度 public int yRotationMinLimit = -90; public int yRotationMaxLimit = 0; //旋转速度 public float xRotationSpeed = 250.0f; public float yRotationSpeed = 120.0f; //旋转角度 private float xRotation = 0.0f; private float yRotation = 0.0f; /// <summary> /// 鼠标右间点下移动进行旋转 /// </summary> void CameraRotate() { if (Input.GetMouseButton(1)) // 0:鼠标左键;1:鼠标右键;2:鼠标中键 { if (mMouseState == MouseState.None) { // 保存当前的旋转角度,默认为0,0的时候代表第一次,获取一下 Vector3 currentRotation = transform.rotation.eulerAngles; if (xRotation == 0.0f && yRotation == 0.0f) { // 暂时不知道为啥X和Y要反过来 yRotation = -currentRotation.x; xRotation = 360 - currentRotation.y; } //Input.GetAxis("MouseX")获取鼠标移动的X轴的距离 xRotation -= Input.GetAxis("Mouse X") * xRotationSpeed * 0.02f; yRotation += Input.GetAxis("Mouse Y") * yRotationSpeed * 0.02f; yRotation = ClampValue(yRotation, yRotationMinLimit, yRotationMaxLimit);//这个函数在结尾 //欧拉角转化为四元数 Quaternion rotation = Quaternion.Euler(-yRotation, -xRotation, 0); transform.rotation = rotation; } } } #endregion #region Camera fov //fov 最大最小角度 public int fovMinLimit = 25; public int fovMaxLimit = 75; //fov 变化速度 public float fovSpeed = 50.0f; //fov 角度 private float fov = 0.0f; void GetDefaultFov() { fov = mCamera.fieldOfView; } /// <summary> /// 滚轮控制相机视角缩放 /// </summary> public void CameraFOV() { //获取鼠标滚轮的滑动量 fov -= Input.GetAxis("Mouse ScrollWheel") * Time.deltaTime * 100 * fovSpeed; // fov 限制修正 fov = ClampValue(fov,fovMinLimit, fovMaxLimit); //改变相机的 fov mCamera.fieldOfView = (fov); } #endregion #region Camera Move float _mouseX = 0; float _mouseY = 0; public float moveSpeed = 10; /// <summary> /// 中键控制拖动 /// </summary> public void CameraMove() { if (Input.GetMouseButton(2)) // 0:鼠标左键;1:鼠标右键;2:鼠标中键 { _mouseX = Input.GetAxis("Mouse X"); _mouseY = Input.GetAxis("Mouse Y"); //相机位置的偏移量(Vector3类型,实现原理是:向量的加法) Vector3 moveDir = (_mouseX * - transform.right + _mouseY * - transform.forward); //限制y轴的偏移量 moveDir.y = 0; transform.position += moveDir * 0.5f * moveSpeed; } else if (Input.GetMouseButtonDown(2)) { mMouseState = MouseState.MidMouseBtn; UnityEngine.Debug.Log(GetType() + "mMouseState = " + mMouseState.ToString()); } else if (Input.GetMouseButtonUp(2)) { mMouseState = MouseState.None; UnityEngine.Debug.Log(GetType() + "mMouseState = " + mMouseState.ToString()); } // WASD控制相机的前后左右移动 float horizontalInput = Input.GetAxis("Horizontal"); float verticalInput = Input.GetAxis("Vertical"); Vector3 direction = new Vector3(horizontalInput, 0, verticalInput).normalized; transform.Translate(direction * moveSpeed * Time.deltaTime); // Ctrl键控制相机向下移动 if (Input.GetKey(KeyCode.LeftControl) || Input.GetKey(KeyCode.RightControl)) { transform.Translate(Vector3.down * moveSpeed * Time.deltaTime); } // 空格键控制相机向上移动 if (Input.GetKey(KeyCode.Space)) { transform.Translate(Vector3.up * moveSpeed * Time.deltaTime); } } #endregion #region tools ClampValue //值范围值限定 float ClampValue(float value, float min, float max)//控制旋转的角度 { if (value < -360) value += 360; if (value > 360) value -= 360; return Mathf.Clamp(value, min, max);//限制value的值在min和max之间, 如果value小于min,返回min。 如果value大于max,返回max,否则返回value } #endregion }
-
.NET Framework 4.6.2 运行库离线安装包下载 | .NET Framework 4.6.2 Offline Installer 下载 本站 C# 程序开发 框架 除特殊说明外 均采用 .NET Framework 4.6.2 ,在此记录 运行时 下载地址,方便下载官网下载官网离线安装包:https://dotnet.microsoft.com/zh-cn/download/dotnet-framework/thank-you/net462-offline-installer官网中文安装包:https://dotnet.microsoft.com/zh-cn/download/dotnet-framework/thank-you/net462-offline-installer蓝奏云分流官网离线安装包(蓝奏云下载):https://cnwy.lanzouo.com/iQ0Jg2079wlc官网中文安装包(蓝奏云下载):https://cnwy.lanzouo.com/iPlJd207a10b
-
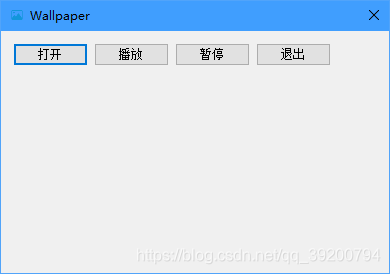
Wallpaper的原理和C#实现(含源文件) layout: posttitle: Wallpaper的原理和C#实现(含源文件)date: 章于 2024-04-06 09:36:32 发布author: 'zhangtao'header-img: 'img/post-bg-2015.jpg'catalog: falsetags:-Wallpaper原理和实现-c#wallpaper是一款优秀的动态壁纸软件,除了播放动画以外,还可以执行程序,甚至可以实时响应鼠标移动。windows的桌面是由不同的二窗体构成,包括图标层,背景层,背景层显示桌面壁纸,图标层放置图标,且图标层背景透明,因此可以直接看到后面的背景层,鼠标右键弹出菜单也是在图标层完成。wallpaper在图标层和背景层之间插入了自己的窗口,因此可以显示动画,执行代码。前面已经提到图标层是一个透明的覆盖全屏的大窗口,因此鼠标事件只会在图标层响应,而wallpaper可以实时响应鼠标可能是利用了Hook拦截了鼠标事件,并加入自己代码。既然知道了原理就可以自己实现。首先创建两个窗体,一个用来播放视频,一个用来控制 上图是控制窗口,也是主窗口。另一个视频窗口较为简单,直接用MediaPlayer覆盖全屏就行,注意需要设置WindowState为Maximized,即启动时立即最大化,同时播放器要隐藏ui,即设置uiMode为none。在主窗体的load事件里新建VideoForm。为了让VideoForm能够夹在图标层和背景层中间,需要将VideoForm的父窗体设置为背景窗体。现在需要查找背景窗体的句柄,使用窗口查看器发现背景窗体没有窗体名称,因此无法直接定位,但是我们知道它的类名是WorkW,它的父窗体是Program Manager,所以我们可以遍历所有WorkW窗体,如果其中一个窗体的父窗体是Program Manager,那么这个窗体就是背景窗体。C#不支持直接这种接近底层的操作,因此需要调用user32.dll实现[DllImport("user32.dll", EntryPoint = "SetParent")] private static extern int SetParent(int hWndChild,int hWndNewParent); [DllImport("user32.dll", EntryPoint = "FindWindowA")] private static extern IntPtr FindWindowA(string lpClassName, string lpWindowName); [DllImport("user32.dll", EntryPoint = "FindWindowExA")] private static extern IntPtr FindWindowExA(IntPtr hWndParent, IntPtr hWndChildAfter, string lpszClass, string lpszWindow); [DllImport("user32.dll", EntryPoint = "GetClassNameA")] private static extern IntPtr GetClassNameA(IntPtr hWnd, IntPtr lpClassName, int nMaxCount); [DllImport("user32.dll", EntryPoint = "GetParent")] private static extern IntPtr GetParent(IntPtr hWnd); public static void SetFather(Form form) { SetParent((int)form.Handle, GetBackground()); } private static int GetBackground() { unsafe { IntPtr background = IntPtr.Zero; IntPtr father = FindWindowA("progman", "Program Manager"); IntPtr workerW = IntPtr.Zero; do { workerW = FindWindowExA(IntPtr.Zero, workerW, "workerW", null); if (workerW != IntPtr.Zero) { char[] buff = new char[200]; IntPtr b = Marshal.UnsafeAddrOfPinnedArrayElement(buff, 0); int ret = (int)GetClassNameA(workerW, b, 400); if (ret == 0) throw new Exception("出错"); } if (GetParent(workerW) == father) { background = workerW; } } while (workerW != IntPtr.Zero); return (int)background; } }其中GetBackground函数负责查找背景层窗体,SetFather负责把一个窗体设置成另一个窗体的子窗体。为了使用指针功能,需要先开启不安全的代码功能 :项目—??属性(??是你的项目名称)—允许不安全代码。这个方法在Windows 10 21H1 19043.1110上测试有效,但是不保证在其他系统有效,例如,在vista系统上就会返回空指针,这可能是因为vista系统上的背景窗体不满足上面所讲的关系。一旦返回空指针,会导致设置父窗体失败,最后视频会在图标层上方播放,此时的动态壁纸软件就彻底变成了一个全屏播放器。如果遇到上面这种情况,可以使用MicrosoftSpy来查找背景窗体,并根据具体情况改写上面的代码。这里利用了windows窗口的一个特性:如果A窗体在B窗体上面,那么A窗体也会在B窗体的子窗体上面。给控制窗体的四个按钮写上事件private void Form1_Load(object sender, EventArgs e) { main = new VideoForm(); player = main.player; Window.SetFather(main); main.Show(); } private void button1_Click(object sender, EventArgs e)//打开 { OpenFileDialog open = new OpenFileDialog(); open.Filter = "媒体文件(所有类型)|*.mp4;*.mpeg;*.wma;*.wmv;*.wav;*.avi|所有文件|*.*"; if (open.ShowDialog() == DialogResult.OK) { player.URL = open.FileName; } } private void button2_Click(object sender, EventArgs e)//播放 { player.Ctlcontrols.play(); } private void button3_Click(object sender, EventArgs e)//暂停 { player.Ctlcontrols.pause(); } private void button4_Click(object sender, EventArgs e)//退出 { main.Dispose(); System.Environment.Exit(0); }其中main是视频播放窗体,player是播放器运行点击退出 虽然程序退出了,但是桌面变成了一张白纸,极其难看,目前暂不知道为什么会发生这种情况,个人猜测是windows考虑到背景是一张静态图,所以不会实时刷新,而刚刚被覆盖掉的地方就会保持最后一次刷新的颜色,刚才点击“退出”时,由于先dispose了视频播放窗体,导致背景变成白板,如果不点击“退出”,直接结束进程,那么背景就会变成黑板,因为MediaPlayer就是黑色的既然如此,我们只需要让背景刷新一下就可以,显然在切换壁纸的时候,windows不得不刷新背景,所以我们可以先获取当前壁纸,然后把壁纸切换成当前壁纸,这样实际效果看起来没有任何变化,但是让windows为我们刷新了一次背景。[DllImport("user32.dll", EntryPoint = "SystemParametersInfo")] public static extern int SystemParametersInfo(int uAction, int uParam, StringBuilder lpvParam, int fuWinIni); public static bool Refresh() { StringBuilder wallpaper = new StringBuilder(200); SystemParametersInfo(0x73, 200, wallpaper, 0); int ret = SystemParametersInfo(20, 1, wallpaper, 3); if(ret != 0) { RegistryKey hk = Registry.CurrentUser; RegistryKey run = hk.CreateSubKey(@"Control Panel\Desktop\"); run.SetValue("Wallpaper", wallpaper.ToString()); return true; } return false; }改写“退出”按钮事件private void button4_Click(object sender, EventArgs e)//退出 { main.Hide(); this.Hide(); Window.Refresh(); main.Dispose(); System.Environment.Exit(0); }之所以先隐藏,是因为在dispose和refresh执行的空隙里会有一瞬间的白屏,如果先隐藏就可以避免这种情况。因为视频壁纸需要常驻后台,而控制窗口不可能常驻桌面,所以我们需要改写它的Formclosing,取消窗体关闭事件,并隐藏窗体private void Form1_FormClosing(object sender, FormClosingEventArgs e) { e.Cancel = true; this.Hide(); }给窗体加上NotifyIcon控件,该控件可以显示任务栏角标,改写双击事件,双击角标时显示控制窗体private void notifyIcon1_MouseDoubleClick(object sender, MouseEventArgs e) { this.Show(); }到现在完整的Wallpaper已经制作完成,但是目前仅能播放视频。当然也包括图片,但是你需要设置MediaPlayer的循环播放,否则图片显示几秒后就会变成纯黑壁纸。看看GPU占用情况 以上数据是我在播放电影《龙之谷精灵王座》时的资源占用情况,该电影共1.83GB,可以看到内存占用不到100MB,GPU0是核显,核显占用也才2%,比起wallpaper已经非常优秀了,但同时功能也非常单一,不过如果仅仅用来播放视频,完全可以用来替代wallpaper。如果你想要实现更多好玩的功能,也可以往视频播放窗体里加别的东西,但是需要注意一点,所有需要交互的事件都不会响应,比如鼠标点击,你只能通过控制窗体来修改视频播放窗体的内容。源代码:https://gitee.com/y141111/wallpaperEXE文件:https://gitee.com/y141111/wallpaper/releasesEXE文件链接打开后是一个压缩包,里面包含两个dll和一个exe,这三个文件需要放在同一目录下才可以运行
-
WPF线程,线程中刷新UI界面 WPF匿名线程执行Thread thread = new Thread(() => { 此处填写代码 }); thread.Start();WPF线程启动Thread thread = new Thread( 此处填写要执行的函数 ); thread.Start();WPF线程中更新UIthis.Dispatcher.Invoke(DispatcherPriority.Normal, (ThreadStart)delegate { 此处填写代码 });DemoThread thread = new Thread(() => { this.Dispatcher.Invoke(DispatcherPriority.Normal, (ThreadStart)delegate { CarInfoViewMode_.CarID = CarID; CarInfoViewMode_.CarProvince = Ytools.proCode2str(province); CarInfoViewMode_.CarArea = SqlHelper.sendSQL(str); CarInfoViewMode_.CarType = Ytools.typeCode2str(size); }); });