搜索到
183
篇与
的结果
-
 ESP32 | WIndows ESP-IDF 编程(二) 点灯程序创建好 hello_world 模板后,在根目录下创建 comm 文件夹,用于放组件comm 中创建一个 CMakeLists.txt,创建一个 led 文件夹led 文件夹中创建 led.c 和 led.h目录结构如下:├─comm │ │ CMakeLists.txt │ │ │ └─led │ led.c │ led.hcomm/CmakeLists.txt:set(src_dirs LED) set(include_dirs LED) set(requires driver) idf_component_register( SRC_DIRS ${src_dirs} INCLUDE_DIRS ${include_dirs} REQUIRES ${requires} ) component_compile_options(-ffast-math -o3 -Wno-error=format=-Wno-format)comm/led/led.c#include "led.h" #include "driver/gpio.h" /* 可配置的宏 */ #ifndef LED_GPIO #define LED_GPIO 2 // GPIO2 #endif #ifndef LED_LEVEL_ON #define LED_LEVEL_ON 0 // 0=低电平点亮 #endif void led_init(void) { gpio_config_t io_conf = { .pin_bit_mask = (1ULL << LED_GPIO), .mode = GPIO_MODE_OUTPUT, }; gpio_config(&io_conf); gpio_set_level(LED_GPIO, !LED_LEVEL_ON); // 初始熄灭 } void led_set(bool on) { gpio_set_level(LED_GPIO, on ? LED_LEVEL_ON : !LED_LEVEL_ON); } void led_toggle(void) { static bool s_state = false; s_state = !s_state; led_set(s_state); }comm/led/led.h#ifndef LED_H #define LED_H #include <stdbool.h> /** @brief 初始化 LED 引脚 */ void led_init(void); /** @brief 控制 LED 开关 @param on true 点亮,false 熄灭 */ void led_set(bool on); /** @brief 翻转 LED 状态 */ void led_toggle(void); #endif /* LED_H */增加 main.c 文件main/maim.c:#include "freertos/FreeRTOS.h" #include "freertos/task.h" #include "led.h" void app_main(void) { led_init(); while (true) { led_toggle(); vTaskDelay(pdMS_TO_TICKS(500)); } }main文件夹 CMakeLists.txt 更改启动文件,增加 comm 依赖main 文件夹中的 CMakeLists.txt 添加 REQUIRES commmain/CMakeLists.txt:idf_component_register( SRCS "main.c" PRIV_REQUIRES spi_flash INCLUDE_DIRS "" REQUIRES comm )根目录 CMakeLists.txt 增加 comm 依赖增加 set(EXTRA_COMPONENT_DIRS comm)语句# The following lines of boilerplate have to be in your project's # CMakeLists in this exact order for cmake to work correctly cmake_minimum_required(VERSION 3.16) include($ENV{IDF_PATH}/tools/cmake/project.cmake) set(EXTRA_COMPONENT_DIRS comm) # "Trim" the build. Include the minimal set of components, main, and anything it depends on. idf_build_set_property(MINIMAL_BUILD ON) project(Demo1)编译运行。done!
 -
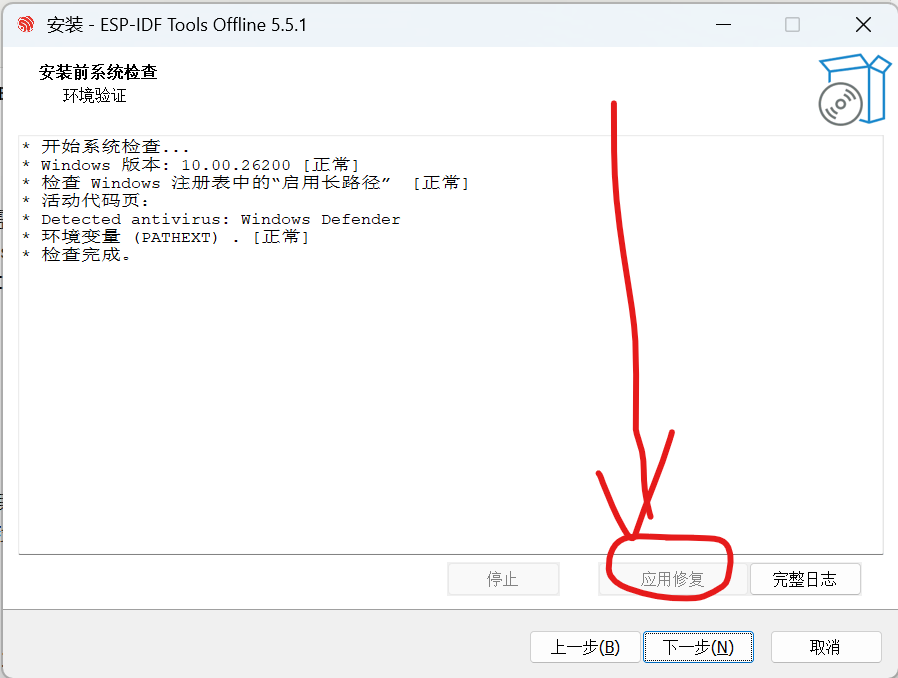
ESP32 | WIndows ESP-IDF 编程(一) 目标环境: VSCODE+ESP-IDF 使用 VSCODE 进行编程,编译,下载。下载ESP-IDF 下载由于使用 VSCODE 进行开发,所以就不需要 Espressif-IDE 了,只下载 ESP-IDF 即可ESP-IDF 安装包下载:https://dl.espressif.cn/dl/esp-idf/这里下载 ESP-IDF v5.5.1 - Offline InstallerVSCODE 下载自行下载安装就行这里不再赘述安装ESP-IDF 安装安装过程中如下界面需要注意一下,“应用修复” 按钮为灰色即可继续进行安装,如果可以点动的话记得修复一下(可能是长路径启用没开开也可能是其他问题,需要解决一下)然后一直下一步就行了安装完成后检查一下系统环境变量 sysdm.cpl 有没有如下两个变量,如果没有需要自己补上,后面 VSCODE 会用到。VSCODE 安装VSCODE 安装不再赘述,只要装上就行了。安装插件 ESP-IDF:装好后需要配置一下 ESP-IDF 插件。配置 ESP-IDF 插件ctrl + shift + p 打开输入 >ESP-IDF Configure ESP-IDF EXtension选择配置 ESP-IDF 插件打开配置页面(需要等待一会儿)打开后如下图所示,选择高级(1/3) 配置 ESP-IDF此处需要注意,ESP-IDF Tools 需要手动补上 \tools 配置如下点击 Configure Tools等待加载完成(2/3) 配置 ESP-IDF这一步如果第一次安装,选择 Download ESP-IDF Tools如果已经安装过了 乐鑫的编译器 选择 use exiting...(3/3) 配置 ESP-IDF至此已经配置完毕,创建一个新项目试一下创建第一个点灯程序选择 New project 点击第一个 use esp-idf...给项目起名字,选择存放位置,选择板子连接的串口。配置好后点击选择模板继续选择一个模板进行项目开发,这里我们为了更好理解 ESP-IDF 的模板工程,选择 Hello World下拉列表选择 ESP-IDF然后选择 hello_world点击 Create Project using template hello_world注意右下角提示,创建完成后 会提示 xx项目已创建,是否打开,我们选择yes 将会打开这个项目打开后需要先对板子进行一次配置,点击下方区域小齿轮图标选择 Serial flasher config主要是 flash size,根据板子实际情况选择如果不知道板子 flash 大小,可通过 esptool.py flash_id 命令进行查看我的是 4MB 这里就选择4MB直接点击一下编译下载,选择 UART 等待编译下载完成,控制台输出 ESP32 串口输出的内容编译下载没有问题,点灯下篇文章
-
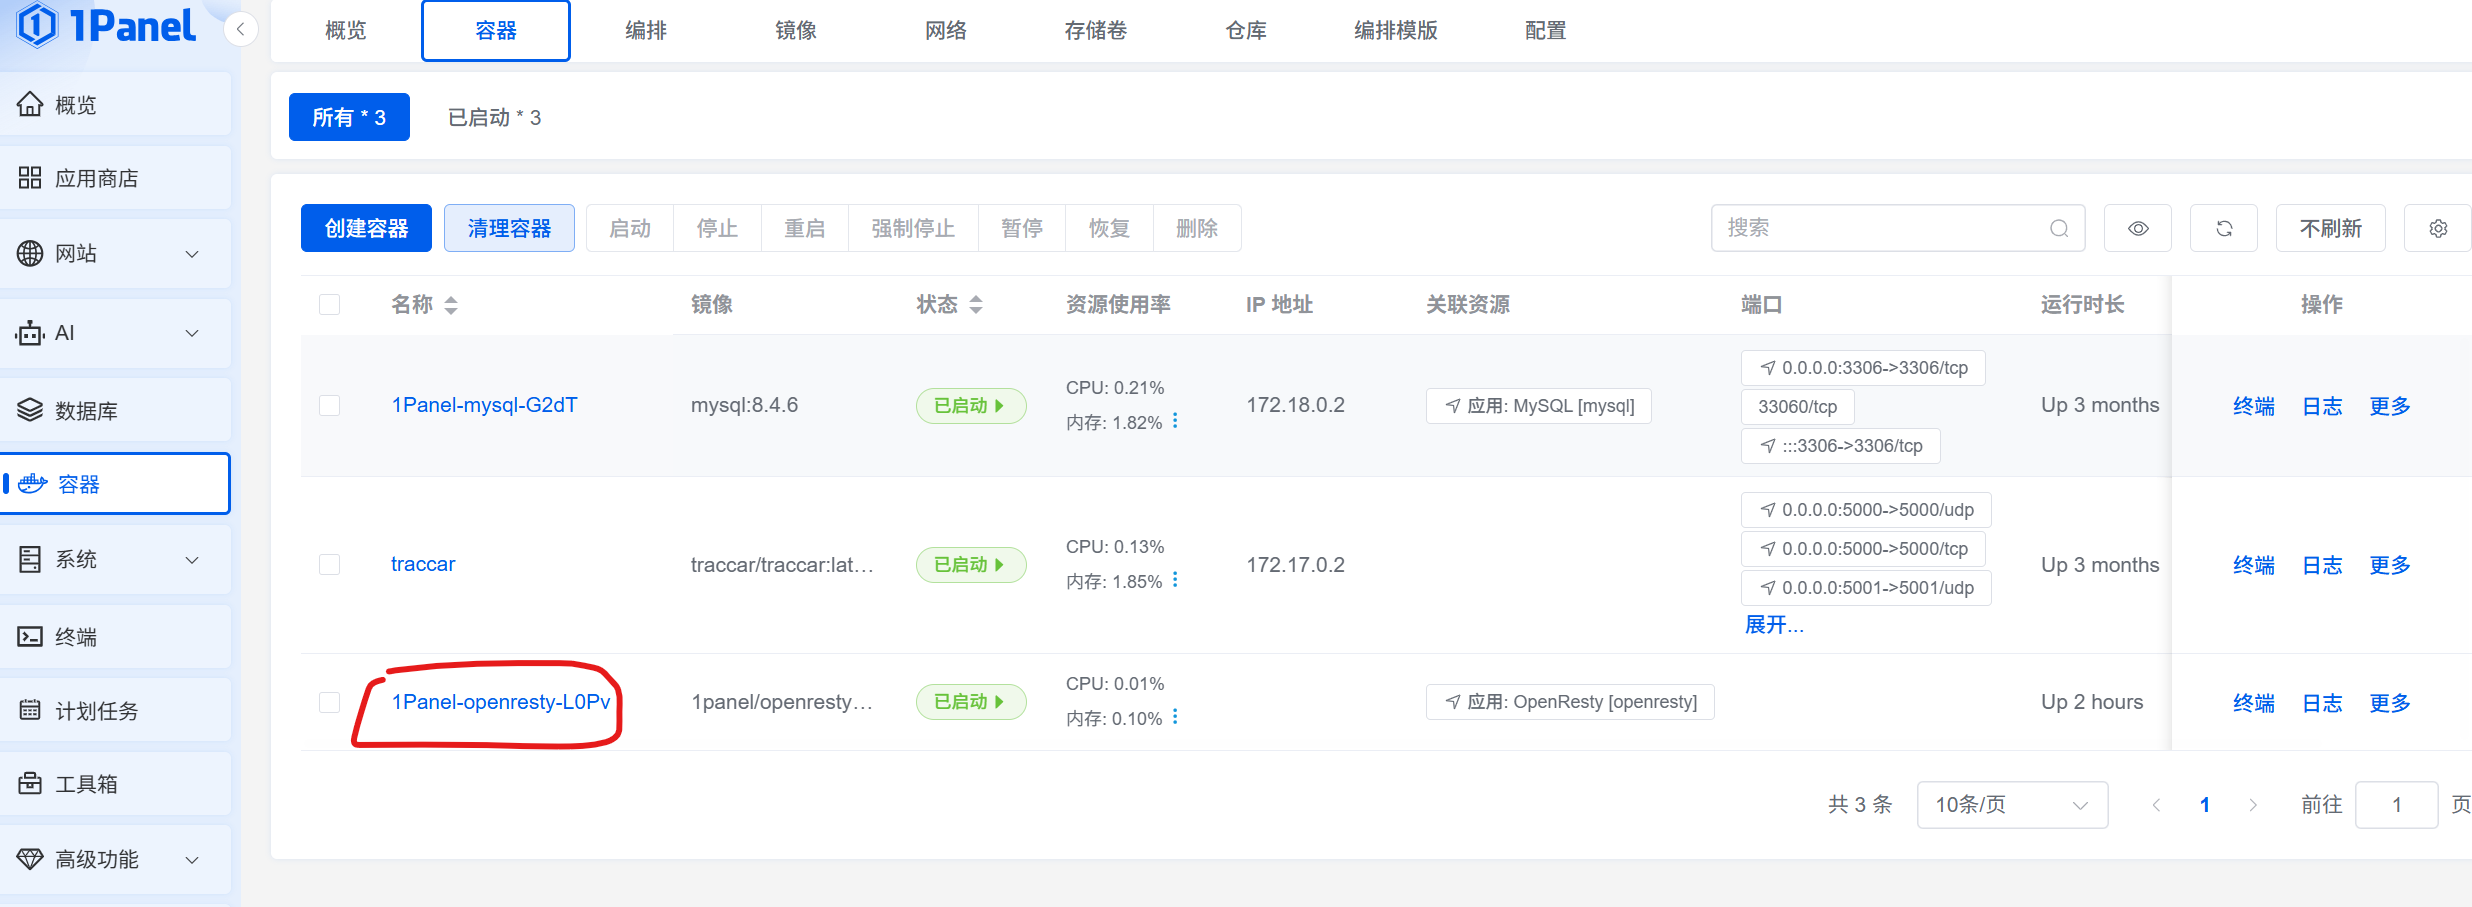
ngx_brotli 模块编译 || Arm Linux(ARM64Ubuntu) 下编译 Nginx 的 Brotli 模块/OpenResty 添加 Brotli 模块 为 OpenResty 添加 Brotli 模块,使其支持Brotli压缩/解压(ARM64 Ubuntu 完整踩坑记录)起因,使用 1panel 面板安装 openresty 进行加速(反代缓存)某一网站,由于该网站启用了 br 压缩,导致 css 文件中的字符串无法替换,openresty 需要 ngx_brotli 才可以启用 br 压缩支持,故编译了一下这个模块,使其支持一、背景某资源域名默认启用 Brotli 压缩(br)。在反向代理场景下,如果想用 sub_filter 替换 CSS 里的字体路径,必须让 Nginx 先解压 → 修改 → 再输出明文。官方 OpenResty 镜像(包括 1Panel 封装)并未携带 Brotli 模块,需要自行编译动态模块 .so。本文记录在 ARM64 Ubuntu 20.04 下,为 Docker 内 OpenResty 1.27.1 编译并启用 Brotli 的完整流程,可直接复刻到 CI/CD。非 Docker 同理。二、环境信息组件版本宿主机Ubuntu 20.04 ARM64Docker 镜像openresty/openresty:1.27.1.2-2-1-focalNginx 核心1.27.1Brotli 模块github.com/google/ngx_brotli(main)三、编译步骤(宿主机或容器内均可)1. 安装依赖sudo apt update sudo apt install -y git cmake build-essential libpcre3-dev zlib1g-dev libssl-dev libbrotli-dev2. 拉取模块源码git clone --recurse-submodules https://github.com/google/ngx_brotli.git /root/nginx1.27.1/ngx_brotli3. 下载与运行版本一致的 Nginx 源码# 查看容器内版本 docker exec <容器> nginx -v # nginx version: nginx/1.27.1 wget https://nginx.org/download/nginx-1.27.1.tar.gz -O /root/nginx1.27.1/nginx.tar.gz tar -xf /root/nginx1.27.1/nginx.tar.gz -C /root/nginx1.27.1 && cd /root/nginx1.27.1/nginx-1.27.14. 配置并编译动态模块./configure --with-compat --add-dynamic-module=/root/nginx1.27.1/ngx_brotli make modules # 1.9.11+ 专用快捷目标成功输出:objs/ngx_http_brotli_filter_module.so objs/ngx_http_brotli_static_module.so四、引用模块Docker 中引用模块查看 docker 容器的名称,如果使用的 1panel 直接在后台页面就能查看容器名称如果没有面板或使用的其他面板请自行查找容器名称比如此处 OpenResty 的容器名称为 1Panel-openresty-L0Pv编译好的文件存放在 /root/nginx-1.27.1/nginx-1.27.1/objs 中连接到服务器,将模块文件复制到 Docker 容器内。export CONTAINER_NAME=1Panel-openresty-L0Pv export BROTLI_FILES=/root/nginx-1.27.1/nginx-1.27.1/objs docker cp "$BROTLI_FILES/ngx_http_brotli_filter_module.so" "$CONTAINER_NAME:/usr/local/openresty/nginx/modules/ngx_http_brotli_filter_module.so" docker cp "$BROTLI_FILES/ngx_http_brotli_static_module.so" "$CONTAINER_NAME:/usr/local/openresty/nginx/modules/ngx_http_brotli_static_module.so"其他方式引用模块如果是可执行文件,或其他方式,参考上述步骤五、启用模块Docker 中启用模块如果是 1panel 安装的 openresty,在1Panel的面板中进入配置文件目录 /opt/1panel/apps/openresty/openresty/conf ,编辑 nginx.conf 文件在 nginx.conf 顶部(events 之前)如下代码:load_module modules/ngx_http_brotli_filter_module.so; load_module modules/ngx_http_brotli_static_module.so;同时在 http 中加入 brotli 的配置代码: brotli on; brotli_comp_level 9; brotli_static on; brotli_types application/atom+xml application/javascript application/json application/vnd.api+json application/rss+xml application/vnd.ms-fontobject application/x-font-opentype application/x-font-truetype application/x-font-ttf application/x-javascript application/xhtml+xml application/xml font/eot font/opentype font/otf font/truetype image/svg+xml image/vnd.microsoft.icon image/x-icon image/x-win-bitmap text/css text/javascript text/plain text/xml;六、验证注意修改容器名称,我这里是 1Panel-openresty-L0Pv ,其他名称需要替换# 容器内检查 docker exec 1Panel-openresty-L0Pv nginx -t # test is successful # 客户端验证 curl -I -H "Accept-Encoding: br" \ https://your.cdn/xxx/assets/site.css响应头出现:content-encoding: br同时 CSS 内路径已能被查找替换。七、常见报错速查现象原因解决unknown directive "brotli"未加载 .so顶部 load_moduledlopen() ... .so: cannot open shared object file文件不存在/架构不符确认 .so 已复制且 arm64make: *** No rule to make target 'modules'未生成 Makefile先 apt install libpcre3-dev 再 ./configuresub_filter 不生效后端返回 br/gzip用 gunzip on; brotli on; 先解压八、小结ARM64 下 没有官方预编译 Brotli 模块;用 与运行版本一致的 Nginx 源码 + --with-compat 即可产出动态 .so;编译完复制到容器,两行 load_module 即可启用;结合 gunzip/brotli 模块,可在反向代理中随意修改 原本被压缩的文本流。至此,Brotli 压缩 + 路径替换 全链路打通,资源加速完成 ✅
-
Nginx || 反代任意网站 反代配置:server { listen 80; server_name aa.com; #改成自己的域名 root /www/sites/aa.com; #改自己的服务器目录 access_log /www/sites/aa.com/log/access.log main; #改自己的服务器目录 error_log /www/sites/aa.com/log/error.log; #改自己的服务器目录 set $custom_host "https://www.baidu.com"; set $custom_host3 "/"; set $custom_host5 "/"; if ($request_uri ~* ^\/((http|https)://(www.)?(\w+(\.)?)+)(.*?)$) { set $custom_host $1; set $custom_host3 $6; } if ($custom_host3 = ""){ set $custom_host3 "/"; } if ($custom_host3 = " "){ set $custom_host3 "/"; } if ($request_uri ~* ^\/((http|https)://(www.)?(\w+(\.)?)+)(.+)\?(.+)$) { set $custom_host3 $6; } set $custom_host2 "www.baidu.com"; if ($request_uri ~* ^\/((http|https)://)((www.)?(\w+(\.)?)+)(.*?)$) { set $custom_host2 $3; set $custom_host5 $1; } if ($request_uri ~* ^\/((http|https)://)((www.)?(\w+(\.)?)+)$) { set $custom_host2 $3; set $custom_host5 $1; } set $current "https://"; if ($scheme = https) { set $current "https://"; } location / { rewrite /(.*)$ $custom_host3 break; proxy_connect_timeout 100s; # proxy_set_header x-forwarded-for $remote_addr; # proxy_set_header X-Real-IP $remote_addr; # proxy_set_header X-Forwarded-For $proxy_add_x_forwarded_for; set $ishttp "http"; if ($custom_host5 = https://) { set $ishttp "https"; } proxy_ssl_server_name on; proxy_set_header X-Forwarded-Proto $ishttp; proxy_set_header Host $custom_host2; proxy_cache_key $host$uri$is_args$args; proxy_headers_hash_max_size 512; proxy_headers_hash_bucket_size 128; proxy_buffer_size 64k; proxy_buffers 32 64k; proxy_busy_buffers_size 128k; proxy_set_header Cookie $http_cookie; proxy_cache_methods GET; proxy_cache_methods POST; proxy_cache_methods HEAD; proxy_redirect off; proxy_set_header Referer https://$custom_host2$custom_host3; proxy_set_header User-Agent $http_user_agent; # 防止谷歌返回压缩的内容,因为压缩的内容无法替换字符串 proxy_set_header Accept-Encoding ""; #proxy_connect_timeout 15000; proxy_send_timeout 15000; proxy_read_timeout 15000; sub_filter_types *; proxy_cache_valid 200 304 301 1s; add_header MJJCDN-Cache "$upstream_cache_status"; # proxy_temp_file_write_size 512000k; resolver 8.8.8.8; #改为自己想要的DNS proxy_set_header Accept-Encoding ""; sub_filter_types *; sub_filter_once off; proxy_temp_file_write_size 512000k; sub_filter "<head" '<base href="$current$host/$custom_host/" />\n<head'; sub_filter 'https://' '$current$host/https://'; sub_filter 'http://' '$current$host/https://'; sub_filter "\"//" '"$current$host/https://'; sub_filter '"/' '"$current$host/$custom_host/'; sub_filter "'//" "'$current$host/https://"; sub_filter "'/" "'$current$host/$custom_host/"; sub_filter '"/search' '"search'; sub_filter '"/images' '"images'; sub_filter ', /images' ', images'; sub_filter "http://$custom_host2" "$current$host/$custom_host"; sub_filter "https://$custom_host2" "$current$host/$custom_host"; proxy_pass $custom_host; # # set $request_uri "qqqq"; # add_header Content-Type "text/plain;charset=utf-8"; # return 200 "Your IP Address:$custom_host2</br>$request_uri"; } }用法:aa.com #默认是百度 aa.com/https://www.google.com #则打开的是Google
-
图像识别模型训练 | 苹果花识别(unet 像素级识别)Apple/Strawflower 分割训练全流程(Windows 版) Apple/Strawflower 分割训练全流程(Windows 版)一、项目概述数据集使用:https://agdatacommons.nal.usda.gov/articles/dataset/Data_from_Multi-species_fruit_flower_detection_using_a_refined_semantic_segmentation_network/24852636上框资源中的 AppleA目标:利用 USDA 公开数据集,训练一个像素级「花/背景」二分类分割模型数据:174 张 2K 分辨率图像 + 130 张单通道掩码(255=花,0=背景) 2k 分辨率原图单通道掩码方案:U-Net + ResNet34 预训练,Windows 本地 GPU/CPU 均可跑通语言:Python ≥3.8,PyTorch ≥1.12二、目录结构flower_seg/ ├─ data/ │ ├─ images/ IMG_0248.JPG … │ └─ masks/ 248.png … ├─ checkpoints/ best.pth ├─ train.py # 一站式训练脚本 └─ README.md # 本文档三、快速开始下载数据集并放到对应文件夹数据集下载地址:https://agdatacommons.nal.usda.gov/articles/dataset/Data_from_Multi-species_fruit_flower_detection_using_a_refined_semantic_segmentation_network/24852636上框资源中的 AppleA创建环境conda create -n unet conda activate unet pip install torch torchvision segmentation-models-pytorch albumentations tqdm训练cd flower_seg python train.py推理见「六、推理示例」四、核心踩坑与解决问题报错提示解决Win 多进程RuntimeError: ...spawn...把训练代码包进 main() + if __name__ == '__main__':;num_workers=0通道检查失败...shape consistency...is_check_shapes=FalseRandomCrop 越界Values for crop should be non negative...改用 A.Resize(512,512) 或先 PadIfNeededIoU 指标移除no attribute 'utils'手动计算:(inter+1e-7)/(union+1e-7)五、训练脚本(train.py)# -*- coding: utf-8 -*- import os, glob, random, cv2, torch import segmentation_models_pytorch as smp from torch.utils.data import Dataset, DataLoader import albumentations as A from albumentations.pytorch import ToTensorV2 from tqdm import tqdm # ---------- 参数 ---------- DATA_DIR = r'data' IMAGE_DIR = os.path.join(DATA_DIR, 'images') MASK_DIR = os.path.join(DATA_DIR, 'masks') CHECK_DIR = r'checkpoints' os.makedirs(CHECK_DIR, exist_ok=True) DEVICE = torch.device('cuda' if torch.cuda.is_available() else 'cpu') BATCH_SIZE = 2 EPOCHS = 60 LR = 1e-3 IMG_SIZE = 512 # ---------- 数据集 ---------- class FlowerDS(Dataset): def __init__(self, img_paths, mask_paths, transform=None): self.imgs, self.masks, self.tf = img_paths, mask_paths, transform def __len__(self): return len(self.imgs) def __getitem__(self, idx): img = cv2.cvtColor(cv2.imread(self.imgs[idx]), cv2.COLOR_BGR2RGB) mask = cv2.imread(self.masks[idx], cv2.IMREAD_GRAYSCALE) if self.tf: res = self.tf(image=img, mask=mask) img, mask = res['image'], res['mask'] return img, (mask > 127).long() def get_paths(): img_ext = ('*.jpg', '*.png', '*.JPG', '*.PNG') imgs_ok, masks_ok = [], [] for ext in img_ext: for img_p in glob.glob(os.path.join(IMAGE_DIR, ext)): name = os.path.basename(img_p) number = name.split('.')[0].split('_')[-1] mask_cand = glob.glob(os.path.join(MASK_DIR, f'{int(number)}.*')) if mask_cand: imgs_ok.append(img_p) masks_ok.append(mask_cand[0]) else: print(f'[Skip] missing mask -> {name}') return sorted(imgs_ok), sorted(masks_ok) # ---------- 增强 ---------- tf_train = A.Compose([ A.Resize(IMG_SIZE, IMG_SIZE), A.HorizontalFlip(p=0.5), A.RandomRotate90(), A.ColorJitter(0.1, 0.1, 0.1, 0.05), A.Normalize(mean=(0.485, 0.456, 0.406), std=(0.229, 0.224, 0.225)), ToTensorV2() ], is_check_shapes=False) tf_val = A.Compose([ A.Resize(IMG_SIZE, IMG_SIZE), A.Normalize(mean=(0.485, 0.456, 0.406), std=(0.229, 0.224, 0.225)), ToTensorV2() ], is_check_shapes=False) # ---------- 训练 / 验证 ---------- def train_one_epoch(model, loader, loss_fn, optimizer, device, epoch): model.train() running_loss = 0. pbar = tqdm(loader, desc=f'Epoch {epoch}') for x, y in pbar: x, y = x.to(device), y.to(device).unsqueeze(1).float() pred = model(x) loss = loss_fn(pred, y) optimizer.zero_grad(); loss.backward(); optimizer.step() running_loss += loss.item() pbar.set_postfix(loss=loss.item()) return running_loss / len(loader) @torch.no_grad() def validate(model, loader, loss_fn, device): model.eval() iou_sum = 0. for x, y in loader: x, y = x.to(device), y.to(device).unsqueeze(1).float() pred = torch.sigmoid(model(x)) > 0.5 inter = (pred & y.bool()).sum() union = (pred | y.bool()).sum() iou_sum += (inter / (union + 1e-7)).item() return iou_sum / len(loader) # ---------- main ---------- def main(): all_imgs, all_masks = get_paths() if len(all_imgs) == 0: print('No valid pairs!'); return paired = list(zip(all_imgs, all_masks)) random.seed(42); random.shuffle(paired) split = int(0.8 * len(paired)) train_img, train_msk = zip(*paired[:split]) val_img, val_msk = zip(*paired[split:]) train_ds = FlowerDS(train_img, train_msk, tf_train) val_ds = FlowerDS(val_img, val_msk, tf_val) train_dl = DataLoader(train_ds, batch_size=BATCH_SIZE, shuffle=True, num_workers=0, pin_memory=False) val_dl = DataLoader(val_ds, batch_size=BATCH_SIZE, shuffle=False, num_workers=0, pin_memory=False) model = smp.Unet('resnet34', encoder_weights='imagenet', classes=1, activation=None).to(device) loss_fn = smp.losses.DiceLoss('binary') optimizer = torch.optim.Adam(model.parameters(), lr=LR) scheduler = torch.optim.lr_scheduler.CosineAnnealingLR(optimizer, T_max=EPOCHS) best_iou = 0.0 for epoch in range(1, EPOCHS + 1): train_loss = train_one_epoch(model, train_dl, loss_fn, optimizer, DEVICE, epoch) val_iou = validate(model, val_dl, loss_fn, DEVICE) scheduler.step() print(f'Epoch {epoch:02d} | train loss {train_loss:.4f} | val mIoU {val_iou:.4f}') if val_iou > best_iou: best_iou = val_iou torch.save(model.state_dict(), os.path.join(CHECK_DIR, 'best.pth')) print(' * best model saved') print('Training finished!') if __name__ == '__main__': main()六、推理示例import cv2, torch, albumentations as A from albumentations.pytorch import ToTensorV2 import segmentation_models_pytorch as smp device = torch.device('cuda' if torch.cuda.is_available() else 'cpu') model = smp.Unet('resnet34', classes=1, activation=None).to(device) model.load_state_dict(torch.load(r'checkpoints\best.pth', map_location=device)) model.eval() tf = A.Compose([ A.Resize(512, 512), A.Normalize(mean=(0.485,0.456,0.406), std=(0.229,0.224,0.225)), ToTensorV2() ]) img = cv2.cvtColor(cv2.imread('test.jpg'), cv2.COLOR_BGR2RGB) x = tf(image=img)['image'].unsqueeze(0).to(device) with torch.no_grad(): mask = (torch.sigmoid(model(x)) > 0.5).cpu().numpy().squeeze(0).transpose(1, 2, 0) cv2.imwrite('mask.png', mask * 255)七、性能参考(RTX-3060 12 G)阶段数值训练 60 epoch≈ 3.5 min最高验证 mIoU0.87512×512 推理35 fps八、后续优化数据:CutMix / Mosaic / 外采更多图模型:Mask2Former、SegFormer、EfficientNet-B3 backbone部署:TensorRT 量化、ONNXRuntime、OpenVINOHappy Training! 🌼未完待续...